
The hike from Fira to Oia is Santorini‘s most famous trekking route, and it’s rightfully iconic. This 10-kilometer journey traces the rim of a massive volcanic caldera, passing through quiet villages, vineyards, and volcanic landscape while the Aegean spreads beneath you. It’s dramatic, doable for people of reasonable fitness, and absolutely one of the best ways to experience Santorini beyond the tourist bustle of the main towns. Let’s break down everything you need to know to hike this successfully.
The Route and Distance
The Fira-to-Oia hike covers approximately 10 kilometers (6.2 miles) along the caldera rim. This isn’t a peak-bagging mountain trek — it’s a horizontal traverse of spectacular scenery. Most hikers complete it in 3-5 hours depending on pace, fitness, and how many breaks you take for photos and views.
The official trail is well-marked with red and blue paint blazes on rocks and walls. You won’t get lost if you’re paying attention. The route is mostly on established paths, though sections involve some rocky terrain and occasional scrambling.
Elevation gain is moderate — you’re not climbing a mountain, but you’re neither on completely flat terrain. The trail has some uphill sections (mostly going up toward Firostefani and Imerovigli), some downhill sections (especially near the end approaching Oia), and multiple short climbs and descents throughout. Total elevation gain is roughly 600-700 meters, spread across the 10 kilometers.
Difficulty Level: Who Should Hike This?
This hike is accessible to most people with reasonable fitness. You don’t need to be an experienced hiker, but being able to walk for 3-5 hours and handle stairs and rocky terrain helps.
Comfortable for: Active travelers, people who hike regularly, anyone in reasonable fitness.
Doable for: Less-active travelers if you take it slow, take frequent breaks, and have time. Older hikers are regularly completing this.
Not recommended for: Very young children (5 km of steady walking is a long distance for small kids), people with significant knee or joint issues (stairs and uneven terrain aggravate these), people afraid of heights (the trail is on a cliff edge).
Pacing matters: Go at your own pace. Rushing makes it less enjoyable and more exhausting. Most successful hikers go slow, take breaks, enjoy views, and find the journey pleasant rather than grueling.
Best Time to Hike
Seasons: May, June, September, October are ideal. Weather is pleasant, temperatures are warm but not scorching, and the sea has that perfect blue color.
Peak season (July-August): Possible but challenging. Temperatures reach 35°C+ (95°F+), the sun is intense, and crowds are heavy. Most hikers need to start at dawn (6:30 AM) to avoid afternoon heat and finish before peak sun intensity. Heat exhaustion is a real concern. It’s doable but honestly uncomfortable.
Shoulder season (April, November): Cool and pleasant if you don’t mind mild temperatures. Fewer crowds. Potentially more cloudy weather but still generally good conditions.
Winter (December-March): Possible but conditions can be unpredictable. Rain occurs, temperatures are cool, and fewer services are open. Not recommended unless you specifically want quiet and solitude.
Time of day: Start as early as possible — ideally 7-8 AM or earlier. This gets you on the trail before crowds, before heat (especially important in summer), and lets you finish in early afternoon. Afternoon starts mean finishing in late afternoon/early evening. Some hikers prefer finishing near sunset for light, but this requires a more ambitious start time.
What to Bring
Essentials:
- At least 2-3 liters of water (critical, non-negotiable). The trail has no reliable water sources. In summer, 3-4 liters isn’t excessive.
- Sun protection: sunscreen (SPF 50+), a hat with brim, and sunglasses. The sun reflects off white buildings and volcanic rock with intense effect.
- Sturdy hiking boots or trail shoes with good grip. The rock can be slippery; proper footwear prevents twists and falls.
- Energy snacks: nuts, energy bars, fruit, something with carbs and protein.
- A phone charged to at least 50% (for emergencies, navigation, photos).
- Light jacket or long-sleeve shirt for sun protection and warmth if wind picks up.
Highly recommended:
Not necessary but convenient:
Starting Your Hike: Getting to Fira
From accommodations: If you’re staying in Fira, you can start directly from your accommodation. If you’re elsewhere on Santorini, you need to get to Fira first.
Getting to Fira: Bus system connects most villages to Fira. Taxis are available but pricier. Some hotels offer shuttles. Many hikers hire taxis to Fira, do the hike, and either take bus/taxi from Oia back or arrange a pickup.
Starting point: The official trail starts from Fira proper (the main town center on the caldera rim). Head toward the caldera edge and look for trail markers (red/blue paint blazes on rocks). The start can be slightly confusing among winding streets, but once you find the caldera rim, the trail becomes obvious.
Alternative start: Some hikers start from Firostefani (northwest of Fira, closer to Oia). This shortens the hike to about 7-8 km and skips the initial Fira climb. It’s more convenient if you’re staying there.
The Trail Details: What You’ll Experience
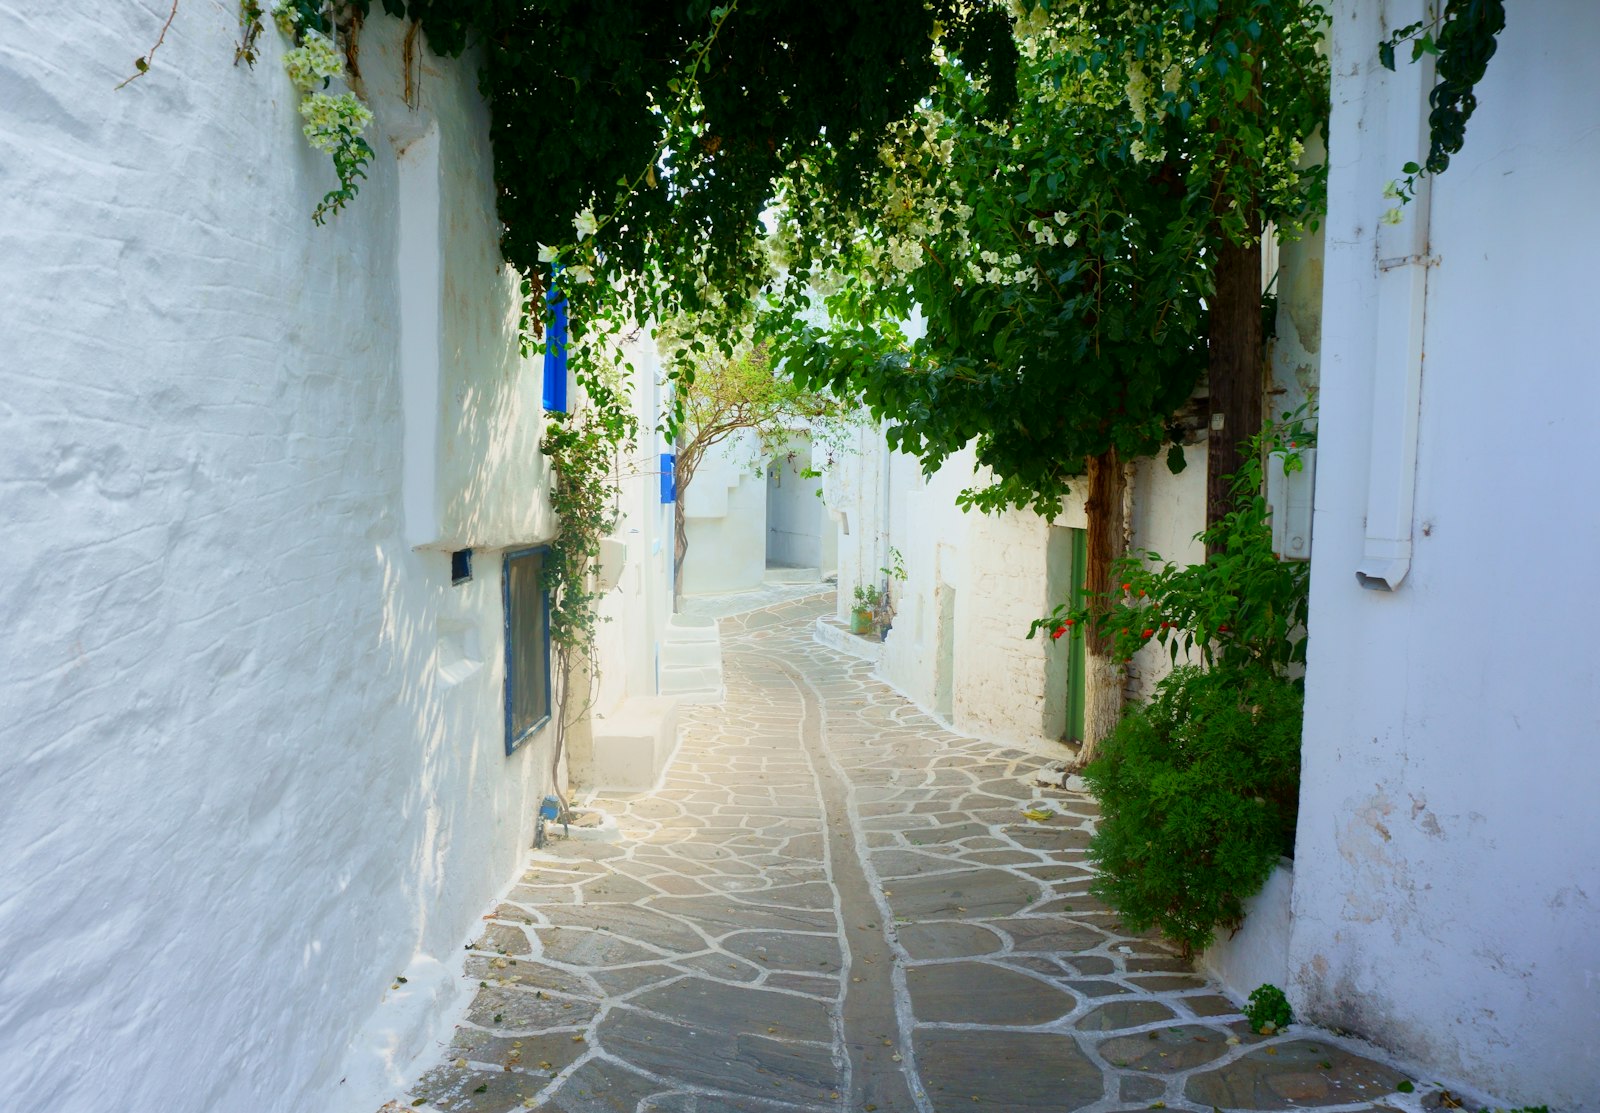
Fira to Firostefani (1-2 km, 30-45 minutes): You climb out of Fira, winding through white buildings and streets. The initial section is steep and involves stairs and scrambling. Once you climb above the town, you emerge onto the caldera rim with views opening dramatically. You continue along the rim, passing through Firostefani village (quaint, small, minimal touristy infrastructure).
Firostefani to Imerovigli (2 km, 45 minutes-1 hour): The rim walk continues with the Aegean and caldera constantly in view. The path winds through vineyards and past small chapels. The landscape becomes more natural, less built-up. Imerovigli is a small, charming village perched on the rim. You pass through it but don’t need to stop.
Imerovigli toward Oia (4-5 km, 1.5-2.5 hours): This is the longest section and features the most dramatic caldera views. The path threads along the rim, sometimes on village streets, sometimes on exposed cliff-edge paths. Sections can feel slightly exposed if you’re afraid of heights, but you’re not at imminent risk of falling — there are stone walls and barriers for safety. The landscape becomes increasingly volcanic and barren.
You pass through several tiny hamlets (mostly empty or minimally inhabited). The trail can be rocky and steep in sections. Expect your knees to start complaining during this phase. The views more than compensate.
Approaching Oia (final 1-2 km): You enter the upper reaches of Oia, winding through streets and eventually reaching the town’s main square. The final approach involves some stairs and street walking through the increasingly touristy town.
Notable Highlights and Photo Spots
Caldera views: The entire hike is spectacular, but certain points stand out: the view from Firostefani looking back toward Fira, the Imerovigli section with its most dramatic volcanic landscape, and approaching Oia with the white-domed town silhouetted against the sea.
Tiny chapels: Several small white chapels dot the landscape, often perched impossibly on the rim edge. They’re genuinely photogenic and photo-worthy stops.
Vineyards: Santorini’s unique volcanic vineyards (the vines grow low, coiled like baskets to protect from wind) are visible on sections of the hike. They’re visually interesting.
Views at different times: Morning light is soft and flattering for photos. Afternoon light is intense and dramatic. The specific light you prefer determines best times for photography.
Practical Hiking Tips
Pacing: Start early but don’t rush. A 3-4 hour hike means you’re going 2.5-3 km/hour, which is leisurely. This pace lets you enjoy views, take rest breaks, and finish without exhaustion.
Break strategy: Stop every 45 minutes or so, even briefly. Sitting with a snack and water is refreshing. Momentum-building hikes feel less tiring than constant slogging.
Dealing with heat: In summer, the sun is intense by 10 AM. Starting at 7 AM is real strategy, not enthusiasm. Wear light-colored, long-sleeved clothing (counterintuitive but better than t-shirts for intense sun). Frequent water sips are better than occasional big drinks. If you feel dizzy or nauseous, you’re overheating — find shade and cool down.
Dealing with crowds: The trail gets busy mid-morning through afternoon in peak season. Starting early largely avoids this. If you encounter crowds, remember you can see them coming — step aside and let faster hikers pass.
Trail navigation: The trail is well-marked, and literally thousands of people hike it yearly without getting lost. If you see a red or blue blaze, follow it. If you haven’t seen a blaze in 10 minutes, backtrack slightly. Your phone map helps verify you’re on track.
The End: Arriving in Oia
You’ll know you’re approaching Oia when the streets get narrower, whiter, and more touristy. You emerge into the town’s main square and central streets. If you don’t have a specific accommodation there, you’re finished.
From Oia onward: Most hikers want to rest, drink cold water, eat, and relax. Oia has plenty of restaurants, cafes, and tavernas. Prices are higher than elsewhere, but quality is good. Sit somewhere with a view and celebrate completing the hike.
Getting back: Bus service connects Oia to Fira and other villages. You can catch a bus, take a taxi, or if you arranged with your hotel, a shuttle. Some hikers spend the night in Oia to avoid the return journey immediately after hiking.
Variations and Alternatives
Reverse direction (Oia to Fira): You can hike it backward. Fira is slightly downhill from Oia overall, so Oia-to-Fira is less strenuous. Both directions work equally well.
Partial hike: You can do just the Fira-to-Imerovigli section (4-5 km, 2 hours) if you lack time or fitness for the full route.
Multi-day version: Some hikers split this into Fira-to-Imerovigli one day, then Imerovigli-to-Oia the next, allowing more relaxed pace and breaks.
Guided tours: Commercial hiking tour operators run this route daily, often including snacks, water, and expert commentary. Costs run €40-70. This is good if you want social hiking experience or feel unsafe navigating solo.
Safety Considerations
Altitude and fatigue: While not high elevation, 5+ hours of walking with elevation changes can leave you tired. Don’t plan anything demanding immediately after. If you hiked in morning, an afternoon beach/rest day is smart.
Sun exposure: This is the real danger. Heat exhaustion sneaks up. If you feel dizzy, unusually thirsty, or nauseous, find shade, drink water, rest. Prevent problems with adequate sun protection and water.
Trail conditions: Rocky sections can be slippery, especially if wet. Wear good shoes. If you feel uncomfortable on exposed sections, go slowly and carefully.
Getting lost: Extremely unlikely but theoretically possible. Mark your position in your phone map at start. If you go longer than 15 minutes without a trail marker, you’ve probably taken a wrong turn.
Emergencies: The trail passes through villages every 1-2 km, so help is relatively close if you encounter problems. Cell phone service is generally good.
Fitness Reality Check
Can you walk 10 km at moderate pace? Can you handle stairs? Are you comfortable with heights (even though you’re safe)? Can you stay hydrated and protected from sun for several hours? If yes to all, you can complete this hike. It’s not a technical mountaineering challenge; it’s an interesting walk with great views.
Many people who don’t consider themselves “hikers” complete this successfully. The views and achievable distance make it accessible to a wider audience than typical trekking routes.
After the Hike
Recovery: Your legs might be sore the next day, especially quads and knees. Light walking and stretching helps. Elevation gain is moderate, so severe soreness is uncommon.
Memory: Most people who complete this hike remember it as a highlight. The combination of physical achievement, stunning views, and genuine travel immersion creates lasting memories.
Seasonal perspective: This hike gives you a completely different perspective on Santorini than the typical viewpoint tourism. You see the island’s geology, feel its scale, and experience it as somewhere to explore rather than just photograph.
Final Thoughts
The Fira-to-Oia hike is simultaneously one of the most touristy and most authentic experiences on Santorini. Thousands do it yearly, but the experience is still rewarding. It’s physically achievable for most people, spectacularly scenic, and one of the best uses of a day on the island.
If you’re visiting Santorini, seriously consider hiking at least a portion of this route. It transforms how you experience the island — from passive observer to active explorer. And somewhere on the rim, with the caldera spreading beneath you and the Aegean beyond, you’ll understand why this little Greek island captivates millions of visitors.
Just bring enough water, start early, and take your time. The views aren’t going anywhere.

Leave a Reply